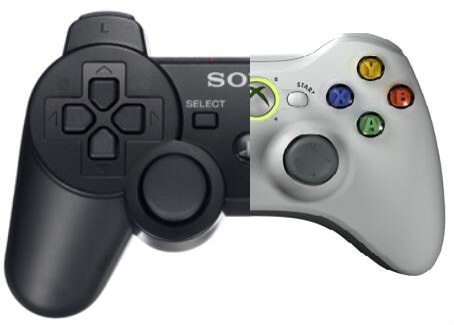
It’s a combination of a playstation 3 controller with an xbox controller. Please reply as soon as possible because I have a piñata project and I can’t find any tutorials on game controller pinatas. Thank you
Answer from Piñata Boy
Whenever I’m making an oddly-shaped piñata I try to break the shape down into simpler shapes that can be built separately and then attached together, but the shape of this game controller doesn’t really lend itself very easily to that approach. So what I would do in this case is cut the shape out of thin cardboard. The approach I would take is to cut one piece for the top and sides, then another piece for the bottom and sides, and then attach the top and bottom pieces where the sides overlap.
First get some large thin cardboard sheets for free from Sam’s or Costco (click the link to find out how). This isn’t corrugated cardboard, but is more like thin cereal box cardboard. Draw an outline of the shape of the controller on the cardboard, then draw a second outline all the way around, but wider than the first, and cut it out around the second outline. (The space in between the two outlines will be the thickness or height of the game controller, so if you want the game controller to be thicker at the top side and thinner at the bottom, you would space the second outline accordingly.) Then you’ll need to make a series of straight line cuts like spokes going from the second outline to the first, so your shape will have floppy fringe all the way around. You can see where I did something like this when making the laces on the football piñata. (For the football piñata I had a third outline around the second one, but you won’t need that here.)
Fold the fringes down at the original outline. This gives you the top of the controller and the sides, but the sides will not be solid, they’ll be a bunch of individual flaps. Tape these together with masking tape after they’ve been folded down.
Then do the same thing for the bottom (but be sure to fold the flaps up, not down). Now you’ll have two pieces: 1) the top and sides of the game controller, and 2) the bottom and sides of the game controller. You can attach these at the sides to create a rough start to a hollow cardboard game controller.
This will take some care and shaping — if you fold the flaps down sharply, then your game controller will have a sharp edge all the way around instead of a smooth curve. So you might want to bend the flaps down without actually folding them, and then tape them together to hold them in place. You might also need to trim the sides in various places in order to fit the top and bottom pieces together.
Once you have the basic shape in place, you can add the additional controller details, or just wait and add those in the decorating stage.
Because this piñata is so oddly shaped, the weight distribution once it’s filled can make it hang crooked. One way to help control the weight distribution is to make a smaller compartment inside the piñata where all the candy goes. One way to do this is to cut strips of thin cardboard and “wall off” those two bottom sections on the inside of the piñata before you attach the top and bottom together. This will keep all the candy in a roughly rectangular section and help it to hang more evenly.
Good luck!