Need help on making a tonka truck pinata for this wknd. Please help with step by step
Answer from Piñata Boy
I can’t give you step-by-step instructions for this because the way you go about doing it will depend on what kinds of materials you have available and what choices you make along the way. There isn’t just one right way to do this, but I’ll give you some ideas for going forward.
Remember that what you’re building is a hollow, breakable sculpture. When you have a lot of flat sides like this, thin cardboard is usually the easiest way to go. Even the tires can be made from two circles and a long strip of thin, flexible cardboard taped around the circumference, or you may be able to find some round container lids that can be decorated as tires.
To make a truck piñata like this one, I would cut out the pieces from thin cardboard and masking tape them together, then cement over the tape with papier mâché. But be careful not to apply too much papier mâché all at once — the wet papier mâché will soak into the cardboard and turn the flat pieces wavy. For some pieces of the truck that do not have to be broken (such as the sides of the bed in the dump truck), you can use thicker cardboard and then decorate right over it without even applying papier mâché. That will save you time and also avoid the risk of soaking the cardboard.
One of the issues you will face in making a piñata like this that has a lot of parts and a lot of straight lines is that when you fill the piñata and hang it, the weight of the candy inside might try to distort the shape of the truck. So try to make the walls of the piñata firm enough that they won’t bend too easily, but also keep them breakable. If you make them too thick, just stab a bunch of holes in them with scissors or a knife and then hide the holes when you decorate.
If you’re in a real hurry, just cut the pieces from thin corrugated cardboard and use masking tape to hold them together and then decorate over it. The cardboard will probably not break when it is hit, but the masking tape will tear, and the truck will come apart at the seams. You can use more masking tape in some places and less in others to help control where you want the piñata to break open.
Good luck!
How would you hang a truck like this for hitting? Normal wire hanger trick? And if so, where would you place it? Thanks. This is the exact truck I need to make for my son. Last year I used your zebra tutorial to make cow and everyone loved it!
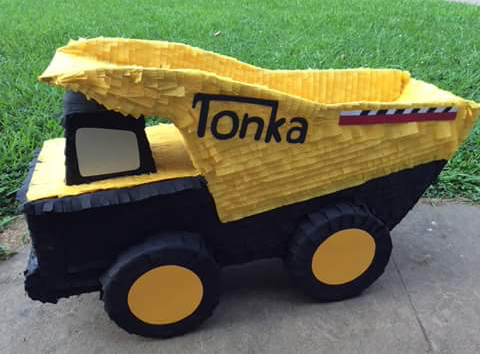
Placing the hanging hook on a really asymmetric piñata like this can be tricky, because you have to consider not only the lopsided weight of the piñata, but also the lopsided weight of the candy. If only the body of the truck is filled with candy, then the center of mass will be a little forward of center. If the hanging hook is placed slightly forward of center, maybe around the front edge of the letter O, the truck will hang about level. But if you also fill the hopper (or dumping bed, or whatever you call it) with candy, that will move the center of mass of the filled piñata backward of center, maybe to the vertical line of the K.
When it’s hard to know where the center of mass of the filled piñata will be, I will sometimes finish the papier mâché work, then cut a hole and fill the piñata and test a few spots for the hanging hook to get the placement just right. Then I remove the candy and decorate.
If you look at the Tarantula page (http://pinataboy.com/gallery/tarantula-pinata/) you’ll see three different tarantula piñatas. The first one had candy in the thorax and abdomen, and the hanging hook was near the back of the thorax. The empty piñata hung leaning forward a little, but the filled piñata hung leaning backward. For the next two Tarantula piñatas you can see the hanging hook is in the front of the abdomen itself. I moved it back so that the filled piñata would still have a slight forward lean. Sometimes it takes a little trial-and-error to find the right spot for the hook.
Good luck!