I have NEVER used paper mâché in my life!, so this is a daunting task for me. I am having a lego themed birthday party for my 6yr old boy in just 2 weeks!!! and he wants a lego head pinata. Whilst there are many sights showing lego block pinatas there are very few lego head ones. Of these there appears to be inconsistent approaches to using cardboard or plastic as well as paper mache and conflicting use of hooks/ties/handles.
I intend on filling my pinata with mini bouncy balls and sweets so it needs to be able to support the weight as well as sustain 20 children hitting it.
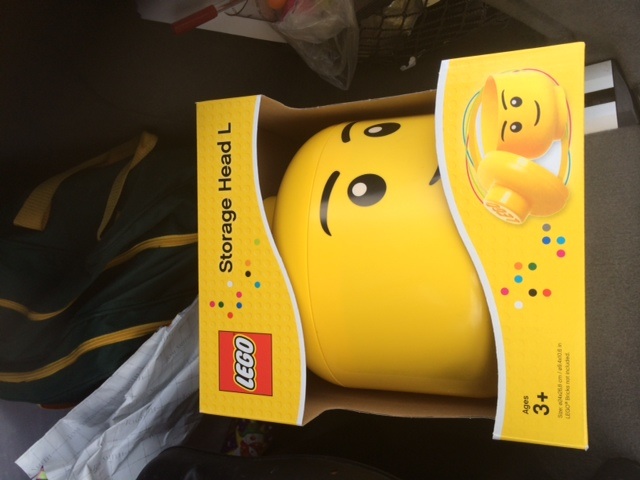
But equally i dont want it to be so tough the children cant break it. I purchased a lego head storage jar towards the theme of the party and don’t know whether I should use this to shape my paper mache mould but am worried about the difficult bits on the head and base. would the moulds break once I tried to remove the actual storage head? Or should I just start from scratch using cardboard/plastic and or paper mache. Where and how would I place the wire coat hanger hook you so brilliantly describe. I have attached a photo of the lego head storage jar I have. I can only upload 1 image but the Internet has images of the limited lego head pinatas available but very little step by step direction. Please please can you help. Lego parties are increasing in popularity but there is limited merchandise around to be able to pull a successful one off.
Thank you Amanda (frantic mom)
Answer from Piñata Boy
You’ll find conflicting advice online for making piñatas because everybody does it a little differently. There isn’t one “right” way — as long as the kids can safely break it open to get to the candy inside, you’ve done it right. Personally, I wouldn’t try to make one by applying papier mâché to the Lego head storage jar, because you’ll have to cut the papier mâché to get it off, and you might have a hard time reconstructing the Lego head after that. (I’ve been in that position myself in the past — you probably CAN make it work, but it was never as easy as I expected.) Here’s how I would make a Lego head piñata:
1) The Lego head is made up of three pieces — the main head section, the peg on top, and the peg on the bottom. I would make the main head section be the candy compartment, and add the pegs purely as decorations. So if a kid whacked the bottom peg off the piñata, nothing would fall out, since it was just attached to the outside bottom of the candy compartment.
2) The main section of the head is a cylinder with rounded ends. The easiest way to make a papier mâché cylinder is to start with a piece of thin cardboard and roll it into a cylinder of the diameter you want. This is how we made the giant head piñatas for Jimmy Kimmel Live. You can get big sheets of thin cardboard for free from Sam’s or Costco. They’re in the stacks of toilet paper and paper towel. Grab a couple of sheets so you can practice if you need to.
3) The best way to make a cylinder is to wrap the cardboard around something and then tape it in place. If you just roll the the thin cardboard into a cylinder shape without having anything inside to support the walls, then when you apply wet newspaper papier mâché strips, the thin cardboard can get wavy or start to collapse in on itself. If you wrap the thin cardboard around a wastebasket or a ball or one of those metal cans that come with three flavors of popcorn inside, the cylinder will be better able to hold its round shape.
4) To make the rounded-off top and bottom of the main head part, cut parallel lines in the top and bottom of the cardboard like we did for the Jimmy Kimmel Live piñatas. This will create flaps that you can gently bend in toward the center, tape down, and then papier mâché over. In the photo where Kerry is cutting those flaps, notice that she drew a guide line to cut to. The flaps have to all be the same length. If they’re not, the flaps will bend unevenly and will create sharp “corner” bumps around the top of the head instead of giving you a smooth bend all the way around.
5) Once you have your thin cardboard rolled into a cylinder and have rounded off the top by folding down the flaps, you can install the hanging hook on the inside of the top. At this point I would apply the first layer of papier mâché to the top and sides of the head, while the bottom is still open. The reason for this is that the thin cardboard will absorb some water from the papier mâché, and if the bottom is still open the wet cardboard will be able to dry more efficiently. You’ll probably need two layers of papier mâché for the sides of the Lego head to hold their shape. Once the top and sides are done, I would round off the bottom the same way you did on the the top, then apply papier mâché to the bottom.
6) When the main head part is finished, you can attach pegs to the top and bottom. The pegs can be made from thin cardboard, with circles taped on to cover the ends. The peg on top might not have a top on it, or it might have a top with a hole in it, since the hanging hook will be hidden in there.
7) You have two weeks, so I encourage you to start as soon as possible and give the papier mâché plenty of drying time between each step. If you have a fan blowing on the papier mâché, that will also help it dry faster. When you’re done if you think the fully dried piñata is too tough for the kids to break, just stab some holes in it with a kitchen knife to create weak spots. Decorate over the holes to hide them, and you’re good to go.
Check out the Jimmy Kimmel Live page — those heads and Lil Wayne’s hat were made using this technique. The Jimmy Kimmel piñata in particular looks a lot like a Lego head — that one was our first attempt, and if you imagine that piñata without the ears, nose, and hair, and with a rounded bottom all the way around instead of a chin in front, that’s pretty much what you’re planning to make (only smaller, I hope!).
Good luck, and I hope we get to see it on the Show Us Yours page when you’re done!